

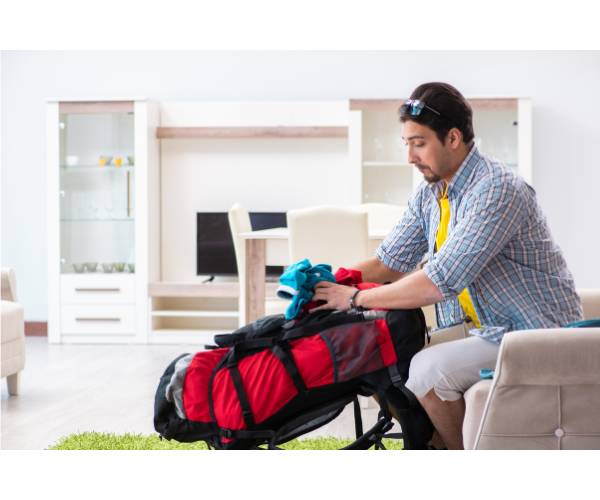
Getting set to go on a hike? It’s vital to know the proper backpack packing techniques. While you’re out exploring, it keeps you secure and comfortable. Learning to pack your backpack properly will improve your hiking, regardless of your experience level.
We may earn commissions when you make qualifying purchases through links or recommendations on our website. However, this does not impact the price you pay for the products or services.
These tips will help you organize your belongings, balance the weight, and make the most of the space in your bag. You’ll be able to concentrate on really appreciating the outdoors this way.
We’ll go over everything in detail, from picking the appropriate equipment to arranging it wisely. So be ready to pack your backpack like a hiking pro and suit up!
Essential Gear Selection
The very first step that needs attention is your gear selection so here we break it down into three categories.
Backpack Dimensions and Type
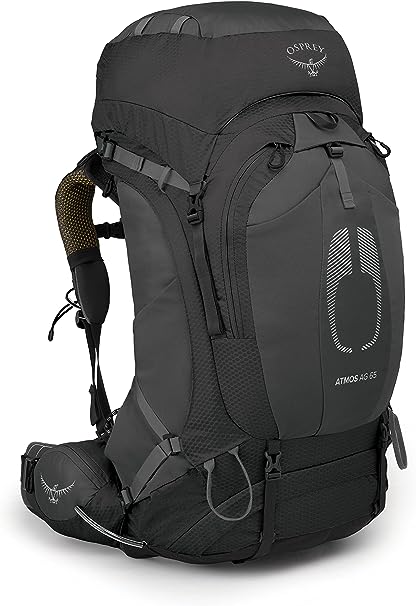
When selecting a backpack for hiking, take your trip’s duration and equipment into account. Depending on your preferred profile and level of stability, choose between an internal or external frame.
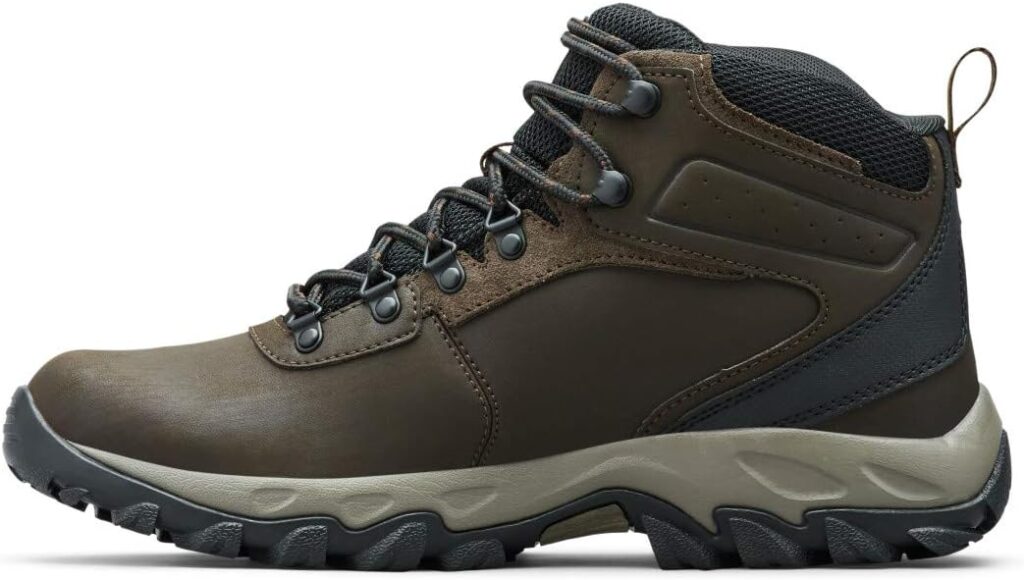
Appropriate clothing and footwear for the weather

For your comfort and safety, you must dress according to the weather. Take this into account when you pack your backpack for a hiking trip. Pack layers of clothing that are simple to add or remove to help you control your body temperature depending on the weather.
Choose insulating mid-layers, waterproof outer layers, and moisture-wicking base layers to stay warm and dry. Remember to include a pair of sturdy socks, a pair of gloves, and a cap.
Equally crucial is footwear; choose robust hiking boots or shoes with adequate traction for a variety of surfaces, and make sure they are well-fitting and broken in to avoid blisters.
Cooking and camping supplies
Bring the necessities for camping, including a tent, sleeping bag, and sleeping pad. Cookware, a multi-tool, a first aid kit, a headlight, and a navigational aid should all be brought along. Choose lightweight and compact choices.
Next Read: How To Avoid Overpacking For A Trip | Tips And Tricks
How to Make the Most of Various Backpack Pockets on Your Hiking Adventure
The different pockets on your backpack provide clever options for arranging and accessing your belongings while you’re headed out on a hiking expedition. Here are some examples of how to use various pockets and what each one is intended for:
The “Brain” Pocket
The topmost zipped pocket, also known as the “brain,” serves as your main point of access. Use it to contain things like snacks, a map, a compass, a headlamp, or sunscreen that you’ll use regularly while hiking. You’ll save time and avoid searching through your backpack by placing important goods here.
Front Pouch or “Kangaroo Pouch”
The stretchy front pouch gives you quick access to any items you might require while out and about. It’s the perfect place to store your raincoat or extra garments that you’ll need to fast access without opening the main compartment. Choose bulky, light goods instead, like a jacket or a small water bottle.
Hip Belt Pocket
Located on your backpack’s hip belt, this pocket is ideal for carrying small, often-used things like trail snacks, lip balm, a tiny camera, or a smartphone. It is convenient to have access to these products without taking off your bag, especially when taking pauses.
Water Bottle Pockets
These pockets, which are on the sides of your backpack’s bottom, are made to accommodate water bottles or hydration reservoirs. You can easily access them and stay hydrated without opening your main container.
Sorting and Prioritizing Items – How Can Avoid Over-Packing
When preparing for a hiking trip, sorting and prioritizing your gear is essential for a well-organized and efficient backpack. Here’s what this involves:
Eliminating Non-Essentials
Consider each item on your checklist carefully to reduce the weight of your Backpack. Remove unnecessary stuff that you can live without or items that have several uses. Carrying extra stuff might make your bag heavier and more difficult to manage when out hiking. By doing this, you may make sure that you’re only carrying what you require.
Hiking Backpack Gear Checklist
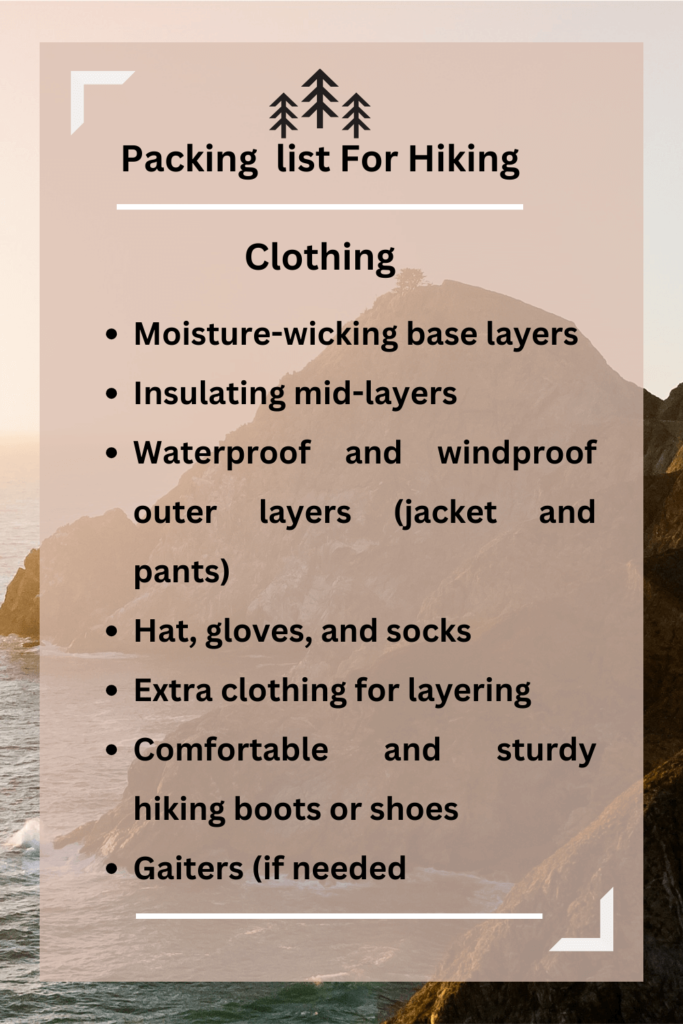
Clothing
- Moisture-wicking base layers
- Insulating mid-layers
- Waterproof and windproof outer layers (jacket and pants)
- Hat, gloves, and socks
- Extra clothing for layering
- Comfortable and sturdy hiking boots or shoes
- Gaiters (if needed)
Shelter and Sleep System
- Tent or shelter
- Sleeping bag appropriate for weather conditions
- Sleeping pad for insulation and comfort
- Pillow or stuff sack for clothes (optional)
Food and Cooking
- Lightweight camping stove
- Fuel canister
- Cookware (pot, pan, utensils)
- Food and snacks
- Water bottles or hydration reservoir
- Water purification method (filter, tablets, or UV)
Navigation and Safety
- Map and compass or GPS device
- Whistle
- First aid kit with basic medical supplies
- Multi-tool or knife
- Headlamp with extra batteries
- Personal medications and prescriptions
Personal Items
- Identification and emergency contact information
- Wallet, cash, and cards
- Sunglasses and sunscreen
- Insect repellent
- Personal hygiene items (toothbrush, toothpaste, hand sanitizer, etc.)
Communication and Electronics
- Mobile phone with charger
- Power bank for charging devices
- Portable charger or solar charger (optional)
Miscellaneous
- Trash bags for waste disposal
- Trekking poles (if preferred)
- Repair kit (sewing kit, duct tape, etc.)
- Trekking umbrella or rain poncho (optional)
- Trekking permits and relevant documents (if required)
Pro Tip: Remember that your gear checklist should be tailored to your specific hiking destination, trip duration, and personal preferences. Pack according to the weather conditions and terrain you’ll encounter, and make adjustments based on your experience level and comfort.
9-Steps How To Pack BACKPACK For Hiking –
PACKING GUIDE IN A NUTSHELL
Time needed: 1 hour
Here we will discuss the best way to pack a hiking bag efficiently..
- Organize Your Gear
Lay out all your gear, clothing, essentials, and water reservoir. Group similar items together to make packing easier.
- Heavy Items at the Bottom
Place heavy items like your sleeping bag or cooking equipment at the bottom of the main compartment. This provides a stable base and helps distribute weight evenly.
- Use Internal Pockets
Utilize internal pockets for smaller, important items like first aid kits, navigation tools, snacks, and any smaller essentials. Keep these easily accessible without rummaging through the main compartment.
- Center of Gravity
Pack heavier items closer to your back and center in the backpack. This maintains balance and stability, preventing the backpack from pulling you backward.
- Lighter Items on Top
Put lighter gear-like clothing in the upper part of the main compartment. This prevents top-heaviness and keeps your center of gravity lower.
- Outer Pockets
Use outer pockets for items you might need on the go, such as water bottles, maps, a rain jacket, and your water reservoir. Keep frequently used items here for quick access.
- Ziplock Bags
Use resealable plastic bags to organize and separate smaller items. This keeps things tidy and helps prevent leaks from toiletries or wet items.
- Water Reservoir
Insert your water reservoir in a dedicated pocket, usually designed near the back of the backpack. Ensure the drinking tube is accessible for easy sipping without removing the reservoir.
- Adjustable Straps and Compression
Adjust straps to cinch down the load, keeping everything compact and preventing items from shifting during your hike. Utilize compression straps to further secure your load and maintain balance.
With these steps, including the placement of your water reservoir, you’ll be able to pack your hiking backpack efficiently and enjoy a well-organized and comfortable adventure on the trails.
How to Make the Most of Your Backpack Straps while Hiking
Certainly! Here’s how you can utilize the backpack straps effectively to enhance your comfort and convenience while hiking:
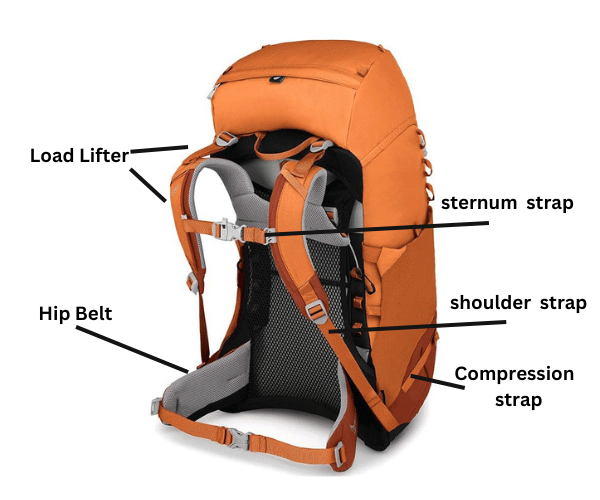
Shoulder Straps
Ensure shoulder straps are adjusted to the right length for your torso. Proper adjustment prevents strain on your shoulders and neck.
Tighten the shoulder straps to distribute weight evenly across your shoulders. Avoid over-tightening, which can cause discomfort and restrict circulation.
Look for backpacks with padded shoulder straps to minimize friction and pressure points on your shoulders.
Chest Strap
Buckle the chest strap to prevent the shoulder straps from sliding off your shoulders. It also helps stabilize the load, reducing sway as you hike.
The chest strap can help balance the weight distribution between your shoulders and chest, enhancing overall comfort.
Hip Belt
Fasten the hip belt around your hips, not your waist. Tighten it snugly to transfer a significant portion of the load to your hips.
The hip belt should carry most of the weight, relieving strain from your shoulders and back. It’s one of the most crucial components for comfortable hiking.
A well-fitted hip belt allows you to move your upper body freely while keeping the backpack stable on your hips.
Load Lifters
Load lifters are straps attached to the top of the shoulder straps. Adjust them to a 45-degree angle from the pack to balance the load between your shoulders and hips.
By fine-tuning the load lifters, you can control the distance of the pack from your back, minimizing swaying and improving stability.
Sternum Strap
The sternum strap connects the shoulder straps across your chest. It helps prevent the shoulder straps from slipping and adds stability to the load.
Adjust the sternum strap to a comfortable height. It should neither be too loose nor too tight, allowing natural movement while keeping the shoulder straps in place.
By using your backpack straps effectively, you’ll achieve a balanced load distribution, enhanced comfort, and improved stability during your hiking adventures. Regularly adjust the straps as needed throughout your hike to maintain a comfortable fit as you adapt to changing terrain and conditions.
Related: How To Repair A Backpack Strap: A Step-By-Step Guide
FAQs
Make sure the hip belt is securely attached and rests on your hips, not your waist when wearing a hiking backpack. Connect the sternum strap for additional stability and adjust the shoulder straps so they rest gently on your shoulders without digging in.
If your backpack has load lifter straps, ensure they are angled properly and that the torso length adjustment is set to match your shoulders. Maintaining proper posture while hiking, balancing the load inside the pack, and making precise changes for comfort and stability based on your body type and backpack style are all important.


One Comment on “How to Pack a Backpack for a Hiking Trip”